Pages

Monday, January 10, 2011

Scotchmallows


So this won't really be a wordy post because I am in the process of moving my life around in Italy and moving into a new apartment, but I wanted to post these photos and a recipe of really delicious chocolate marshmallow caramel candies I made with Livio when he was in Blacksburg. Sorry about the dry spell but once the dust has settled I will be updating with photo's about my life in Italy, the apartment decorating and of course more recipes since I will be cooking basically every day!

Oh and these little delightful candies are delicious and a great present- despite that it's after christmas they could still work well for birthdays, valentines day or just when you want something delicious in general.


Scotchmallows
Recipe inspired by the sees candies product

-25 jumbo marshmallows
-10 oz of good quality dark chocolate (I used ghirardeli semisweet)
-1 cup heavy cream
-5 tbsp. unsalted butter
-½ tsp. vanilla extract
-1¼ tsp. fleur de sel
-1½ cups sugar
-¼ cup light corn syrup
-¼ cup water

Directions:
Line the bottom and sides of an 8-inch square baking dish with parchment paper.  Lightly butter the parchment.
In a small saucepan, combine the cream, butter, vanilla extract, and fleur de sel.  Heat over medium-high heat and bring to a boil.  Remove from the heat and set aside.
In a medium saucepan, combine the sugar, corn syrup, and water.  Heat over medium-high heat, stirring occasionally until the sugar is dissolved.  Boil, without stirring but gently swirling the pan occasionally, until the mixture is a light golden caramel color.
Carefully stir the cream mixture into the caramel – the mixture will bubble up, so pour slowly and stir constantly.  Continue simmering the mixture until it registers 248˚ F on a candy thermometer.  Immediately remove from the heat and pour into the prepared pan.  Let cool for 10 minutes, then lightly place the marshmallows evenly spaced on top of the caramel, I left a couple of millimeters for cutting between each one.  Continue to let sit until completely set and cooled.  Cut into 1-inch pieces (a buttered pizza cutter works well). 
Melt the chocolate in a glass bowl in the microwave until completely melted and soft but not too liquidy so that the chocolate holds when you dip. Dip each candy into the chocolate and place on parchment paper to set. Let set until hardened- about 1 hour.

Monday, December 27, 2010

A post not about food

Things I like right now:

These guys:

Patrickone and Squirellone in my bed
 Reading on break:


 Drinking this:


Wearing pajama's all day


Aveda everything


Professional knife gift sets :-)


Fancy new years shoes (!)


The fact that he'll be here soon :-) 


These biscuits:


Decorating our new apartment 


Homemade salted chocolate dipped caramels


Dreaming about making these cinnamon rolls 


What do you guys like right now?

Thursday, December 23, 2010

Christmas sugar cookies


These delicious traditional cookies can actually work for any holiday, but one of my favorite things to do every christmas is bake cookies and decorate them with my sister while we're also busy decorating our house with christmas decorations. I also had a special helper:


This recipe is classic and delicious and they are soft but hold up well to frosting and decorating.

I prefer to decorate simply with frosting and those pearl bead sprinkles. I like a fancy cookie :-)

You can use whatever you like however!

Sugar Cookies
ingredients:
3 cups all-purpose flour
3/4 teaspoon baking powder
1/4 teaspoon salt
1 cup unsalted butter, softened
1 cup sugar
1 egg, beaten
1 tablespoon milk
Powdered sugar, for rolling out dough


Directions:

Sift together flour, baking powder, and salt. Set aside. Place butter and sugar in large bowl of electric stand mixer and beat until light in color. Add egg and milk and beat to combine. Put mixer on low speed, gradually add flour, and beat until mixture pulls away from the side of the bowl. Divide the dough in half, wrap in waxed paper, and refrigerate for 2 hours.
Preheat oven to 375 degrees F.
Sprinkle surface where you will roll out dough with powdered sugar. Remove 1 wrapped pack of dough from refrigerator at a time, sprinkle rolling pin with powdered sugar, and roll out dough to 1/4-inch thick. Move the dough around and check underneath frequently to make sure it is not sticking. If dough has warmed during rolling, place cold cookie sheet on top for 10 minutes to chill. Cut into desired shape, place at least 1-inch apart on greased baking sheet, parchment, or silicone baking mat, and bake for 7 to 9 minutes or until cookies are just beginning to turn brown around the edges, rotating cookie sheet halfway through baking time. Let sit on baking sheet for 2 minutes after removal from oven and then move to complete cooling on wire rack. Serve as is or ice as desired. Store in airtight container for up to 1 week.


I like to expedite cooling


recipe from here.

Monday, December 20, 2010

The Best Buttermilk Waffles


what I had for breakfast today... I know... SO GOOD

you should have it too :-)

here's the recipe

The Best Buttermilk Waffles
serves 4-6 depending on the size of your waffle iron

Ingredients
2 cups all-purpose flour
1/2 teaspoon salt
2 tablespoons sugar
1 1/2 teaspoons baking soda
1 3/4 cups buttermilk*
2 eggs, separated
4 tablespoons (1/2 stick butter, melted and cooled)
1/2 teaspoon vanilla extract
Canola or other neutral oil for brushing on waffle pan

To make:

Combine the dry ingredients. Mix together the buttermilk and the eggs. Stir in the butter and vanilla.

Brush the waffle iron lightly with oil and preheat it. Stir the wet into the dry ingredients. 

Spread a ladleful or so of batter onto the waffle iron and bake until the waffle is done, usually 3 to 5 minutes, depending on your iron. Serve immediately or keep warm for a few minutes in a low oven.

* The buttermilk can be substituted with 1 1/4 cups of milk at room temperature, mixed with two tablespoons white vinegar, left to clabber for 10 minutes.

Top with maple syrup and serve with bacon :-)

Recipe from smittenkitchen

Wednesday, December 15, 2010

Italian Wedding Cookies

 These little gems are just about my favorite cookies ever! Just ask my previous roommates, Mark, Justin and Dafina and they can tell you how delicious they are...Every time I made a batch, they disappeared in about 2 days :-)

Any who I've been promising I'd post this recipe for a while now, after having made them on three different occasions with success and so here I finally did it!

I'm sorry for the long break between posts but I should be posting more consistently now because I am a college graduate and I am on break, therefore I have lots of time. I will also be updating more about my life as I do these posts so keep on reading! The blog will just continue to improve now.

 Oh and a little bit of background info about these cookies: So Livio and I had them for the first time in Washington D.C. from Whole Foods for breakfast every day. They were so delicious and I missed them so much that I promised that I would get around to making them. While searching for recipes I was shocked at how simple they are for being so delicious! Just 5 ingredients and you can do it all in one bowl!.. I know amazing right? So there is really no excuse not to make these, especially it being the holidays and all they are perfect to give as a gift, make for your family or bring to a Christmas party. They keep for up to 5 days as well.

Italian Wedding Cookies


Ingredients:
2 Sticks of salted butter (1 cup) softened on the counter for several hours
1 1/2 cups powdered sugar, divided
2 cups flour
1 cup finely chopped pecans (any nut will work though, if you prefer almonds or hazelnuts, go for it!)
1 tsp vanilla extract


With a an electric mixer beat butter until light and fluffy. Add 3/4 cup of powdered sugar and cream together.

Combine flour, salt and chopped nuts in a separate bowl. Add the dry ingredients to the sugar mixture and beat until just combined. Stir in vanilla.
Shape the dough into a disk, wrap in plastic, and refrigerate for 30 minutes to an hour (or as long as 2 days).
Heat the oven to 350 degrees (F).
Take the dough out of the refrigerator and roll into 1-inch balls and place on ungreased cookie sheet an inch apart.
Bake for 10-12 minutes until set, but only barely browned on top.
Put the remaining sugar in a shallow bowl.  Cool the cookies on the baking sheet until you can handle them. Roll each cookie in the sugar and put on rack to finish cooling. Once cool, roll them in the powdered sugar.
Enjoy with coffee or tea for breakfast, an afternoon snack or dessert!


Tuesday, October 19, 2010

Justin's Yellow Dal


 Sorry that it's been a while since my last post dearest followers. I have returned to the life of a college student at UCLA and that means 2 things:
1. Not a lot of disposable time to cook when I want
and more importantly
2. Not a lot of disposable money to experiment in the kitchen.

However! I have found a way to bring you a new recipe and this one is quite a gem.

It's a great recipe for anyone who is on a budget and its perfect to make if you are busy because despite taking 1 to 1 1/2 hours, it makes a huge batch that will last you several days. It is also completely balanced nutritionally and VERY healthy for you as it is made with split yellow peas.

My roommate Justin actually invented/inspired this dish. He lived abroad in India for 6 months and missed the delicious street food like the dal so much that he found out a way to make it himself at home...so consider it authentic! It packs a punch because it is full of typical indian spices and thai chiles so despite the fact that its vegetarian, don't feel like you are shorted on flavor. So go visit India...in your kitchen!

Justin's Yellow Dal
Ingredients:

3 tbsp vegetable oil
1 lb bag of split yellow peas + oil for the water
2 medium onions or 1 large
3-6 cloves garlic
2 inches ginger
2 tomatoes
2 tsp salt (I would recommend 3 but it's Justin's recipe)
2 tbsp cumin
2 tbsp chili powder
2-3 tsp turmeric
2 small green thai chiles
garam masala to taste


1. Boil the yellow split peas in approximately 9 cups of water with the chili powder, turmeric and a little bit of oil until they are very soft and tender, without any bite.
       2. Heat the oil on medium low heat- fry cumin for about 30 seconds until it changes color and starts to release an aroma, then you add the minced onion
      3. Saute the onion until its translucent, stirring frequently (as Justin often reminded me)
      4. smash the garlic/ginger into a paste, add to the onions and  cook until the garlic and ginger become fragrant.
      5. add the diced tomato
      6. add the minced green chili
      7. Let the flavors meld and simmer together and when everything is very soft and the oil seperates from the tomato, it’s ready. Take a potato masher and mash it up.
      8.  meanwhile the split peas will finish cooking- sometimes you’ll have some excess water and oil and you pour it off.
      9. then you add the tomatoe mixture to the lentils, and mash it up together
      10. Add the garam masala to taste, and serve with white rice and a sprinkle of cilantro if you have it.


He even went back for seconds...and thirds eheh

Thursday, September 16, 2010

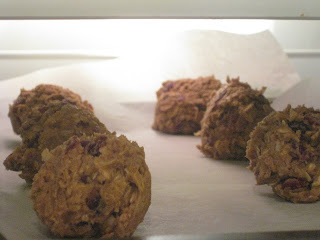
Coconut Cranberry Oatmeal Cookies


So one of my favorite cookies of all time is oatmeal raisin cookies, the only problem being I never really actually liked the raisin part. I do however love cranberries and I actually had them on hand along with some coconut so I thought I'd throw together these deliciously cozy cookies, just in time for the cool crisp weather to come into Blacksburg. They are perfect with tea for an afternoon snack, with a glass of milk for dessert or with your coffee for breakfast. They aren't overly sweet and the cinnamon, oats and coconut all work really well together.

I adapted this recipe from this one and basically replaced the cranberries with raisins and the walnuts with coconut. In mine, you could replace the dried fruit for any other that you prefer, and the coconut for any type of nut you like. Or you can even go for chocolate chips instead of nuts! Go crazy...the only real thing I'd say is key to make these super chewy and thick like mine, is to chill the dough for at least an hour before baking them. I formed my dough into the balls before chilling it, because the dough is easier to work with when soft, however the chilling is necessary to get the chewy effect.


Enjoy!

Coconut Cranberry Oatmeal Cookies:

Ingredients
*1 stick of butter (4 tbsp)
*2/3 cup brown sugar
*1 egg
*1/2 tsp vanilla extract

*3/4 cup all-purpose flour
*1 1/2 cups oats
*1/2 tsp baking soda
*1/2 tsp cinnamon
*1/4 tsp salt

*3/4 cup dried cranberries
*1/2 cup un-sweetened coconut flakes

To prepare:
1. Cream the butter and sugar together in a stand mixer on medium speed until light and fluffy. Add the egg and then the vanilla and blend.
2. Mix the flour, oats, baking soda, cinnamon and salt together. Add to the wet ingredients until just incorporated.
3. Stir in by hand the cranberries and coconut.
4. Form into 2 tbsp rounded balls of dough and place on baking parchment paper on baking sheets. Place in the fridge to chill for at least an hour.
5. Preheat the oven to 350 F when you're ready to bake the dough. Bake for 12-14 minutes until golden on the edges and seeming undercooked on top. They will continue to bake a bit on the sheet after you take them out so don't worry they're not underdone. Let them sit on the baking sheet for 10-15 minutes, then place on a rack to cool. These are good for up to 3 days in an airtight container.

Buon appetito!